Net-Cut & Net-Cut Defender
netcut 2.1.4
The most powerful netcut version (2.1.4) ever has been released. ensure
100% working under Wi-Fi. and ensure CUT OFF testing in all network
environment.
To netCut, Wireless network are the same as normal networkRun netcut, Click on "Choice netcard" , select wireless netcard, it should be something name as "b/g/n" or with wireless words.
within seconds, you will see who is on your WIFI network.
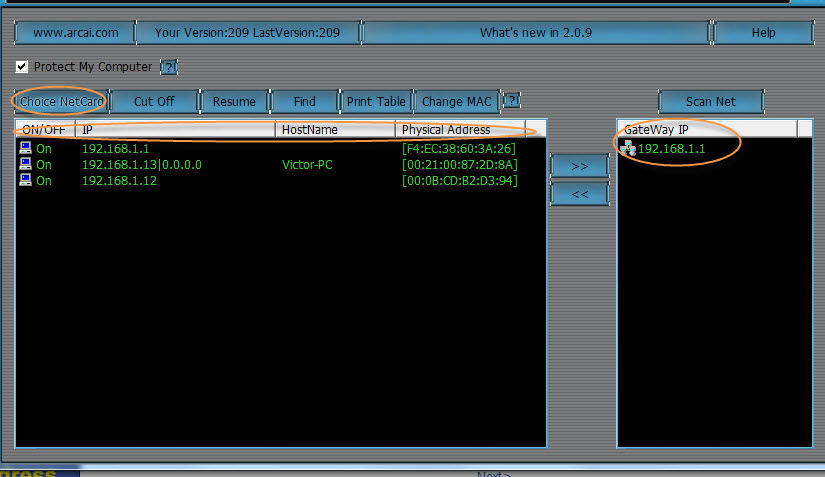
Just Select The MAC address/IP of that hostname who you want to cut-off and Click "Cut 0ff"

Arcai.com netcut-defender 2.1.4
The
only one tool can 100% guaranteed success protect you and your user
away from arcai.com's netcut cut (or alike) ARP SPOOFIng .
ow to see who attack you.You will know someone is trying to cut you off when you see this  .
.
.
When the attacker stopped the attack, or normal time, you will see NetCut Defender Icon as this
Right click on Netcut-Defender you will see a new Menu link name "who cut me" as
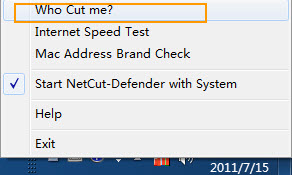
When you click on "Who Cut me", you will see it's IP/MAC/Hostname right away.
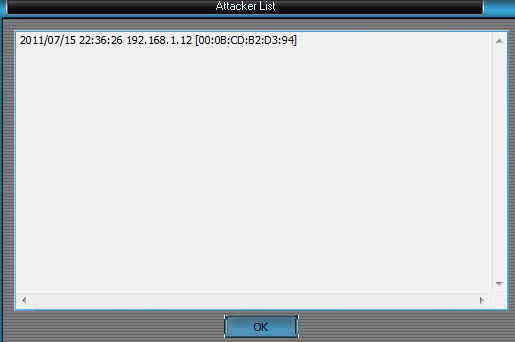
The Attack Record are like this
- "network change reload/Gateway change reload". when you switch WIFI network from Starbuck to mcdonalds network, you don't need restart netcut defender. to ensure your netcut defender has the right information (it does when you do restart The app, but I want it to be better that can do without restart)
So, only one button "Protection Reload" you need to click , here

Hide 0n Just Using Password
First:
Run : "1st Time-Run 0nly"{Run This 0nly 0ne Time( After one time runment No Needed To use it)}
Go To D: Drive And You Can See Folder named: h4cker
Put The Necessary Files,Folders or video anything as you want onto it.
Second:
Run "Hide Me"
Hidden Successful :D
Third:
To Unhide Again Run "Un-Hide"
Unhidden Successful :D
If You again Want to Hide Than Re-run: "Hide ME"
Just by Entering Password You can Hide and Un-hide :D
Securing Your 0wn Data
- Right Click and Select 'Extract File'
- In My case I'm extracting on E:\
After Extraction:
 Click Next..
And select (default) : Standard Truecrypt Volume and click Next

- Select Encryption Algorithm whatever You like:
- Click Next:
- Enter The Amount 0f file You want for making Secret Hiding place on it.
 Click Next Again,
And Enter the Password you want for that Protection.

Select NTFS (Fast 0n Performance)

And Click Format It ll take less time and You Are Ready :) And click Finish


- In My case I'm extracting on E:\
After Extraction:
And select (default) : Standard Truecrypt Volume and click Next
- Select Encryption Algorithm whatever You like:
- Click Next:
- Enter The Amount 0f file You want for making Secret Hiding place on it.
And Enter the Password you want for that Protection.
Select NTFS (Fast 0n Performance)
Click Edit and replace that file name with earlier you created:
After Editing It with Your File :: Save It ::
Double Click On that 'Open.bat'
Type Password in there and It'll Automatically Create Virtual Drive
Put all the file on that Poped off Drive
and just close that drive after you have finished hiding file
You are safe Now :)
Never Delete that file
How to Increase the Internal Memory of Android Devices
Most of the low end android devices comes with a very low internal
storage which after few downloads of applications you start getting low
memory notification. The good news is you can increase the internal
memory.
First your android device has to be rooted,There is absolutely no way you can increase the size of your phone’s internal storage but you can allocate some part of your memory card for your phone to install applications to.
Cautionary Disclaimer: I am not Responsible if your brick you device or something happens to
your Device.
There is no need to wipe your memory card when going through this process, just ensure you have at least 0.5GB to 1.0GB of free space to make it worthwhile. You also do not need to use a microSD card adaptor as the process below creates the partition whilst the phone is connected to your PC.
a) Connect your Memory card to the PC via USB Card reader and then launch MiniTool. You should see the details pop up under ‘Disk 2′. In your case it may show as Removable Disk.

b) Click on the memory card under Disk 2 in MiniTool and then in the left pane, press ‘Move/Resize Partition’. On the blue bar under ‘Size and Location’, move the right arrow towards the left to create the size of the secondary partition desired. In the example below we created a secondary partition with 1018.63MB of space. This value can also be typed in manually in ‘Unallocate Space After’.

c) Once this is done you should see that your memory card is now split into two partitions under Disk 2 of MiniTool. Right click this new partition and then press ‘Create’

If you see this pop-up below, just press ‘Yes’ to continue.

d) You should then see this ‘Create New Partition’ window. Under ‘Create As’ click Primary and then under ‘File System’ click FAT32. Leave the cluster size as default and you can assign whichever drive letter you want. Once finished press OK.

e) This should bring you back to the main MiniTool screen. Now hit the ‘Apply’ button on the top-left of the screen, denoted by a tick symbol.

This will bring up another pop-up window and will take several minutes to both resize and create the secondary partition.

If successful, you should see message below. Congratulations your card is ready to use in conjunction with Link2SD.


Step 3) Download Link2SD and Install it in you device.

Once you see the following message, restart your phone. The app should now be ready to use.


Leave all three check boxes ticked and press OK. Link2SD will now do its
work and move/link the selected apps to your memory card.

Once finished, you should see that the apps you have moved have ‘Linked
-> SD Card’ in red font in the Link2SD app list. Reboot your phone.
 e) Congratulations your phone is now using Link2SD! You should now go to
Settings by pressing the menu button and configure how you would like
Link2SD to work. The main decision here is whether you want to Auto Link
newly installed apps to the memory card. Given that you’ve gone through
the hassle of installing Link2SD we suggest you enable Auto Link and
make worrying about your internal memory a thing of the past.
e) Congratulations your phone is now using Link2SD! You should now go to
Settings by pressing the menu button and configure how you would like
Link2SD to work. The main decision here is whether you want to Auto Link
newly installed apps to the memory card. Given that you’ve gone through
the hassle of installing Link2SD we suggest you enable Auto Link and
make worrying about your internal memory a thing of the past.

First your android device has to be rooted,There is absolutely no way you can increase the size of your phone’s internal storage but you can allocate some part of your memory card for your phone to install applications to.
Cautionary Disclaimer: I am not Responsible if your brick you device or something happens to
your Device.
Guide to using Link2SD on your Android smartphone.
Preparation before starting the Procedure:
1) Rooted Android Phone (Rooting voids your warranty)
visit xda-developers Website to know how to root your Android Device.
3) A Computer
3) A Computer
4) Minitool Partition wizard Home Edition Download and Install It
5) Micro SdCard (2gb and above only)
6) Link2SD
7) USB Card Reader (don't use a phone!)
8) Backup your Memory card (your data in memory card may be erased in the Procedure)
9) Little Brain to follow Steps (very Important)
Follow the Procedure below:
Follow the Procedure below:
Backup your Memory Card Before proceeding to next step
1) Root you Android Device
2) CREATE SECONDARY PARTITION
You now need to create a secondary partition on your microSD memory card that will enable you to use Link2SD.
Note: We will use MiniTool Partition Wizard to
create a secondary partition on your microSD card. This partition can be
ext2, ext3, ext4 or FAT32. We will use FAT32 as it is supported on all
phones and should lead to less troubleshooting later. You can use any
partition manager of your choosing, but the steps below guide you
through MiniTool Partition Wizard. There is no need to wipe your memory card when going through this process, just ensure you have at least 0.5GB to 1.0GB of free space to make it worthwhile. You also do not need to use a microSD card adaptor as the process below creates the partition whilst the phone is connected to your PC.
a) Connect your Memory card to the PC via USB Card reader and then launch MiniTool. You should see the details pop up under ‘Disk 2′. In your case it may show as Removable Disk.
b) Click on the memory card under Disk 2 in MiniTool and then in the left pane, press ‘Move/Resize Partition’. On the blue bar under ‘Size and Location’, move the right arrow towards the left to create the size of the secondary partition desired. In the example below we created a secondary partition with 1018.63MB of space. This value can also be typed in manually in ‘Unallocate Space After’.
c) Once this is done you should see that your memory card is now split into two partitions under Disk 2 of MiniTool. Right click this new partition and then press ‘Create’
If you see this pop-up below, just press ‘Yes’ to continue.
d) You should then see this ‘Create New Partition’ window. Under ‘Create As’ click Primary and then under ‘File System’ click FAT32. Leave the cluster size as default and you can assign whichever drive letter you want. Once finished press OK.
e) This should bring you back to the main MiniTool screen. Now hit the ‘Apply’ button on the top-left of the screen, denoted by a tick symbol.
This will bring up another pop-up window and will take several minutes to both resize and create the secondary partition.
If successful, you should see message below. Congratulations your card is ready to use in conjunction with Link2SD.
Step 3) Download Link2SD and Install it in you device.
This application makes it easy for users with root privileges on their phone to move applications to the SD card.
a) Open the Link2SD app on your phone. You should be greeted with the following menu, check the FAT32 option and click OK.
You will then see the Superuser Request, Select ‘Allow’.
Once you see the following message, restart your phone. The app should now be ready to use.
b) To make sure everything is installed correctly. Click the Menu button
and go to ‘Storage Info’. This will show you the internal memory and
your two partitions on the memory card. In our case, you can see that
the second partition has 1GB free.
c) Now you need to move the apps of your choice to the memory card. Click the Menu button and press ‘Multi-select’.
Choose which apps you want to move by clicking the tick box next to the
app. System apps are greyed out and cannot be selected. Link2SD can only
move apps that are already on the internal memory. If you have apps
already on your SD card, you will need to move them back to the internal
memory before you can link them with Link2SD.
If you want to move all of your apps, pressing the menu button will bring up another menu allowing you to do this.
d) Once you have chosen which apps you want to move, you then need to
hit the menu button and press ‘Actions’, which will bring up the
following menu. Press ‘Create Link’.
Create Facebook Without Last Name
All You Need To do Is Using Indonesia's Proxy & Port
proxy : 118.98.35.251
port: 8080
(Don't know how to
change Proxy Settings then visit this link )
If this Proxy Doesn't work go to this site
And Get New Proxy For
Indonesia
Facebook -> Setting -> Name
Change Your Account Language To : Bahasa Indonesia
Facebook -> Setting -> Name
Change Your Account Language To : Bahasa Indonesia
Change Your Name To -> kﱞﱞﱞﱞﱞﱞﱞﱞﱞﱞﱞﱞk
Remove "k" Letters
Save Your Name
Change Your Name Again To -> kﱞﱞﱞk
Remove "k" Letters
And Save Again......
Here Is Account Without Name

Remove "k" Letters
Save Your Name
Change Your Name Again To -> kﱞﱞﱞk
Remove "k" Letters
And Save Again......
Here Is Account Without Name
Devil Mode

Create "New Folder"
&
Rename It To:
Devil Mode.{ED7BA470-8E54-465E-825C-99712043E01C}
And There You Are
You Activiated Devil Mode Where You have 0ver All Access To Control Panel Wizard'z
Subscribe to:
Posts (Atom)